How to delete Android system apps and bloatware using ADB (No Root)
September 2021 (988 Words, 6 Minutes)
Ah, bloatware. Don’t you just love not being able to remove apps that you don’t want? Sure you can disable the apps, but what if you want to remove them completely from your phone? Fortunately, there is a way to uninstall apps from android using Android Debugging Bridge (ADB), which is a development tool provided by Google. Read on and I will show you how you can remove Facebook from your device (No joke, my phone came pre-packaged with facebook).
* Important Update *
After reading this reddit post, it seems that I looked over an important nuance. When I refer to uninstalling an app in this article, I really mean disabling the app for a user on the device. This method will work if you want a simple way around uninstalling apps. However, if you wish to completely remove apps from your android device, you will likely need to root your phone, which is beyond the scope of this article.
Before you start…
Make sure you have the following items:
- A Computer
- A USB cable
- An Android device (Sorry Apple users)
Step 1: Install Android Debugging Bridge (ADB)
ADB comes with the Android SDK platform-tools package. For instructions on how to install the SDK, head over to the Android Developers website.
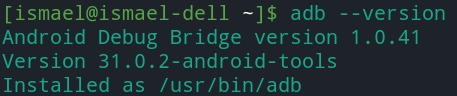
If you are using Linux, you can choose to use your distribution’s package manager instead. For example, for Manjaro users, running sudo pacman -Syu android-tools will update your system and install the platform-tools SDK (which contains ADB). After that, run adb --version to see if ADB is installed. The version of ADB should come up, like so:
Step 2: Turn on developer options and Enable USB debugging
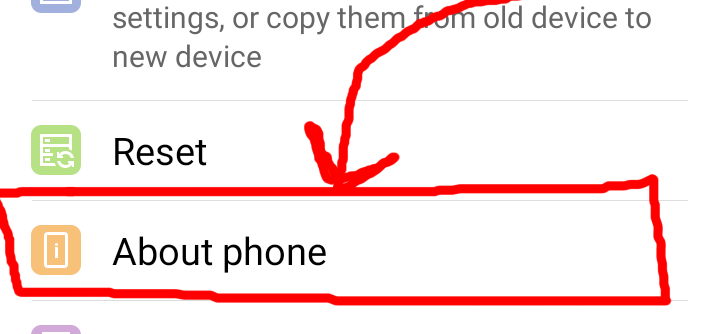
You will not be able to use ADB unless you have developer options on. To turn on developer options, go to your device’s settings, and click on “About Phone” (the exact location of this option will vary from device to device, but it will generally be one of the last options).
Once there, go to Software Info and look for the option called “Build number”.
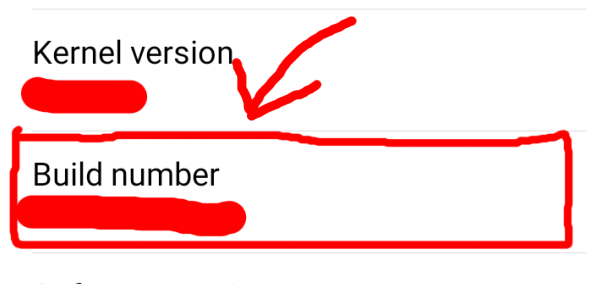
Click on the Build number option repeatedly until you receive a message somewhere on the screen indicating that you “are now a developer”. Go back to the main menu of the settings. You should see a new option called “Developer options” somewhere near the About Phone option from earlier.
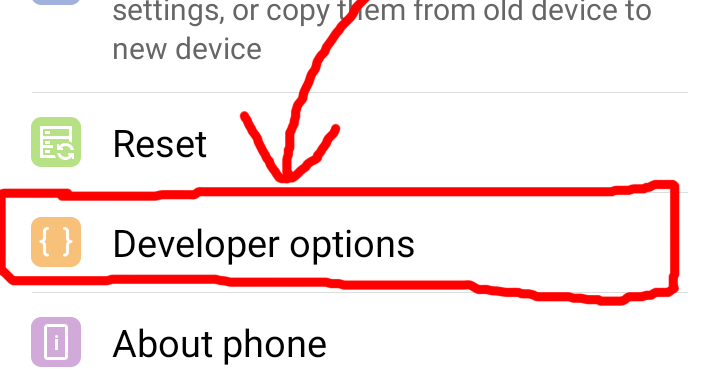
If you see it, then you have successfully enabled developer options.
Note: Please be careful when navigating the Developer options, as it can be quite dangerous.
Next, you will need to enable USB debugging. To enable this, go to Developer options and scroll down until you see the option “USB debugging” under the Debugging section.

Click on the option and accept the warning that may come up.
If you are concerned about security, you can simply disable Developer options once you are done uninstalling all the apps you want.
Step 3: Connect your device to your computer
Get your USB cable out and connect your phone to your computer via USB.
If a dialog comes up that looks like this:
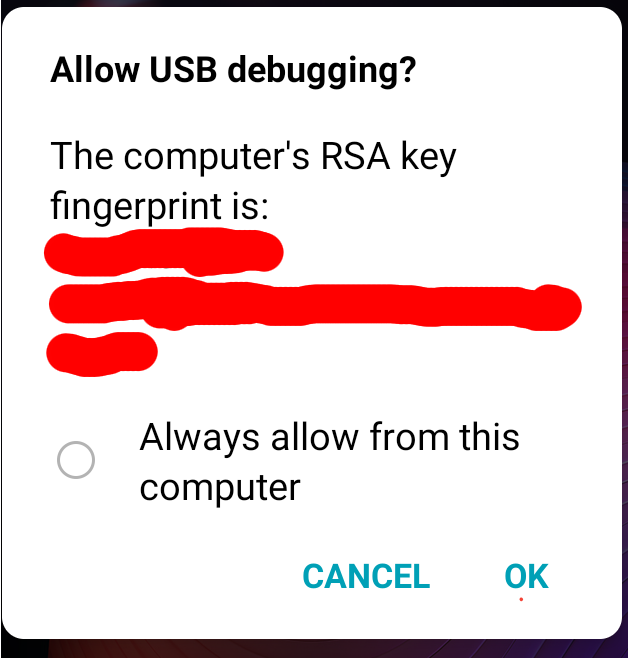
Click on “Ok”. This will allow your computer to connect to your Android phone using USB debugging.
To check whether your Android device is connected to your computer, run adb devices (if you installed the SDK via your distribution’s package manager). If you downloaded the SDK via Google’s website, cd into the platform-tools directory that contains the file adb (adb.exe on Windows) and run adb devices.
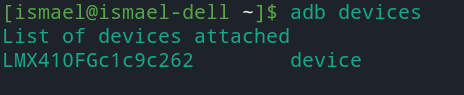
If you see the name of your device displayed under “List of devices attached” without “unauthorized” next to it, you should be good to go.
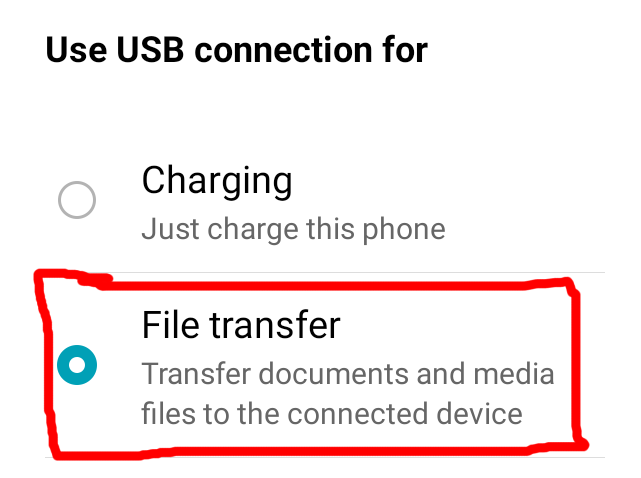
Optional: In the USB options (usually located in the notifications bar), select the “File transfer” option and select “Just Once” (if it isn’t already the default option). This will help prevent possible issues later on.
Step 4: Look for package names
There are 3 ways you can go about doing this.
The first way is to get into your Android device’s shell (by running adb shell) and run pm list packages to list all of your device’s packages. Then, find the package name that sounds like the app you want to remove (on Linux, you can add | grep search-term to the end of the above command to make the search process a little easier).
I would not recommend this method because it is very easy to mistaken one package for another (which can have really bad consequences). Plus, it can get quite tedious at times.
The second method you can use is to search for the app you want to remove on the Google play store. On the app’s download page, you can find the package name at the end of the url in your browser’s search bar.
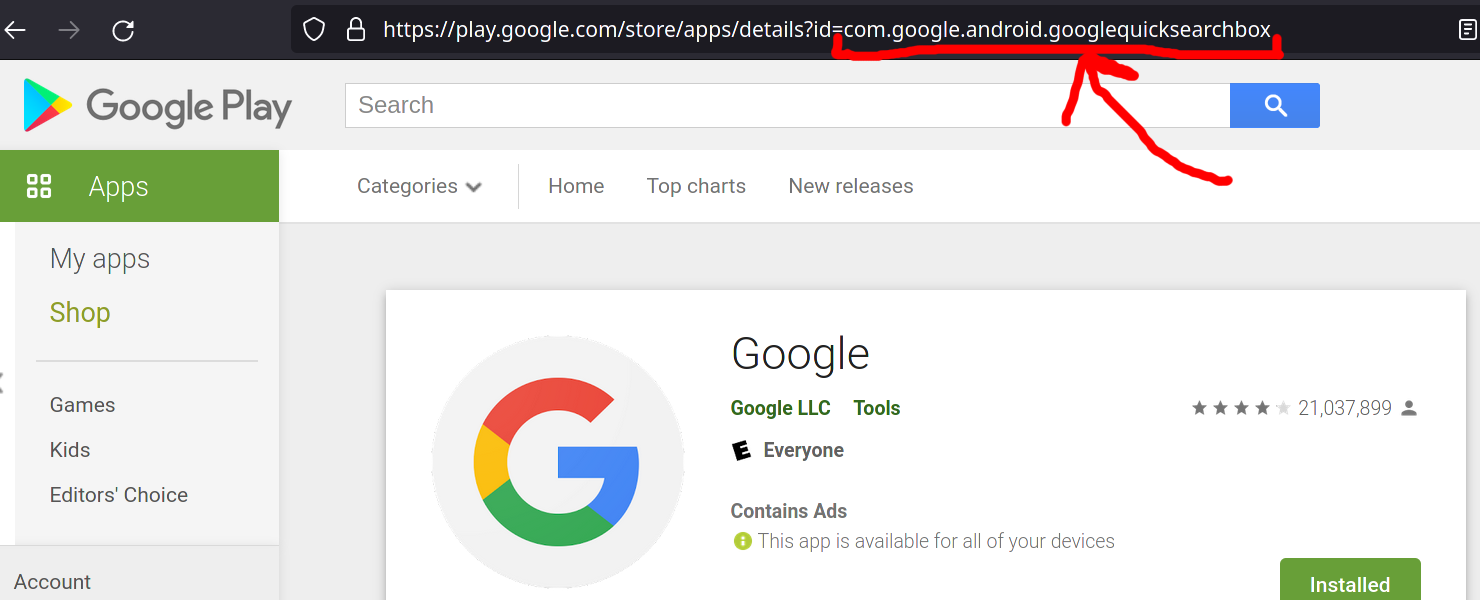
In this example, the package name of the Google app is com.google.android.googlequicksearchbox.
The last method is kind of a last resort in case you can’t find or identify an app’s package name with any of the above methods. You can download an app in the app store that helps you look up the package name of a particular app. My preferred app is Package Name Viewer 2.0, but you can feel free to use whichever app you like.
Step 5: Run some commands
Now comes the fun part. Once you have found the correct package name, you may now begin removing the app. To remove the app go into your Android device’s shell by running adb shell.
Once there, run pm uninstall -k --user 0 package.name (replacing package.name with the name of the package you searched for earlier). You can also run adb shell pm uninstall -k --user 0 package.name if you choose. You should see “Success” after running the above command. If you see anything other than “Success”, then either you don’t have the app to begin with or you misspelled the package name.
Boom! That app you wanted to get rid of is now gone for good.
If you would like an example of adb commands, click here.
I hope this article helped! Make sure to share this article with someone who might find it useful. If you find an error or typo in one of my articles, please let me know.
NOTE: I AM NOT LIABLE FOR ANY DAMAGES THAT HAPPEN BECAUSE OF YOU FOLLOWING ONE OF MY ARTICLES. This is not to say the information here is incorrect. Please be careful.
Thumbnail image source: https://pixabay.com/photos/phone-android-apps-world-map-1869510/